Projector Mounting Photos
This page contains examples of mounting the ICA Training System and projector. Several different mounting approaches are covered and address various room conditions such as tight spaces, ceiling or wall mounted, low or high ceilings, and Side-mount or End-mount. Take a look at these approaches and see what might work best for your ICATS installation!
Universal Mount
ceiling or wall installation, End-mount or Side-mount


The Universal Mount uses commercially available mounting hardware to mount to "solid" ceilings or walls (drywall, wood, etc.) and can work in almost any room situation. The two mounts highlighted at the bottom of the Shop page are geared for ceiling, but wall mounts are also available. These mounts come with the necessary hardware and the mechanical flexibility to mount to your projector, to the wall or ceiling, and to allow tilt adjustment. For ceiling mount, different "drop lengths" are available and provide flexible distance from the ceiling to get best illumination. Two situations where Universal mount may not be suitable are: 1) "drop ceilings"; and 2) Side-mount with lower ceilings where the projector may need an extra few inches of height. In these two cases Chain Mount (below) will be better.
The photos above show a challenging mount with lower ceilings and a beam at the desired location for the projector. The Universal Mount is mounted to the back-side of the beam and is in the perfect spot to illuminate the table.
Chain Mount
ceiling installation, great for "drop ceilings"

This mount works great for "drop ceilings", as you might find in a pool hall or bar, and can be adapted to other situations as well. The projector is initially mounted to a board. The board has 4 small eye bolts in each corner, with a short chain strung across the front two eye bolts. The "3-point connection" to the ceiling is stable. An "S hook" at the end of the front ceiling chain can be used to lengthen/shorten the front ceiling chain for tilt, or moved along the short chain at the front of edge of the board to allow left/right adjustment. The length of the 3 ceiling chains can be adjusted for low or high ceilings and cables can be run through the ceiling for a nice, clean look.
Chain Mount (revisited)
ceiling installation, great for Side-mount, or End-mount with distant walls


This is another example of the Chain Mount, used in a home Side-mount installation. Side-mount generally must be mounted higher (compared to end-mount) and closer than the nearest wall, making a ceiling mount desirable. Like the example above, the projector is initially mounted to a board providing a stable "3-point connection" to the ceiling. The back edge of the board is mounted as close as possible to the ceiling for maximum height that works best for Side-mount. An "S hook" at the end of the front ceiling chain can be used to lengthen/shorten the front ceiling chain for tilt. For higher ceilings, the three chains can be lengthened to lower the projector to a desired height. This mount can also work well for End-Mount in larger rooms where the end walls are too far away to mount to a wall. This specific installation is for an 8' table with the projector at D: 22", H: 8' (8'8" ceiling).
VerticalMount
pipe
Best illumination for Side Mount


"Vertical Mount" is suitable only for side-mount. The projector is positioned pointing roughly straight down, about 1-2 feet away from the table, and with the lens in line with a side pocket. With a typical short-throw projector (~.5 throw ratio), the minimum height is with the projector lens a table width above the surface of the table (9' table=lens at 50" above table surface, 8' table=44", etc.).

One side of this mount is constructed from steel pipe, two flanges and an elbow. The other side is a small board, which transitions from steel pipe flange to a standard projector mount that supports fine-tuning the projector position. Note there is some torque on the flange in the ceiling. If mounting only to a drywall ceiling, a small ceiling plate might be needed to better distribute the weight/torque. "Furniture grade" black PVC pipe can also be used instead of steel pipe.
This "vertical mount" positioning is optimal for the amount of light on the table, and will not interfere with table lighting, including perimeter lighting. As usual, projector positioning is fairly flexible...so long as the surface of the table is fully illuminated, Calibration will adjust the image for perfect fit.
VerticalMount
off-the-shelf mount
Best illumination for Side Mount
An alternative "Vertical Mount" approach is to use the off-the-shelf mount HERE. Like the "pipe" Vertical Mount above, it is suitable only for side-mount and has the same projector positioning requirements (see above). While this option offers a perhaps "cleaner looking" mount, it has a very limited range (~17" - 26") to drop the projector from the ceiling to proper lens position and hence will work in a limited number of room situations.
The photographs below show one arm configuration that can work well with typical projectors. If your projector mounting holes are in a different configuration, experimentation will be required to properly mount the projector.
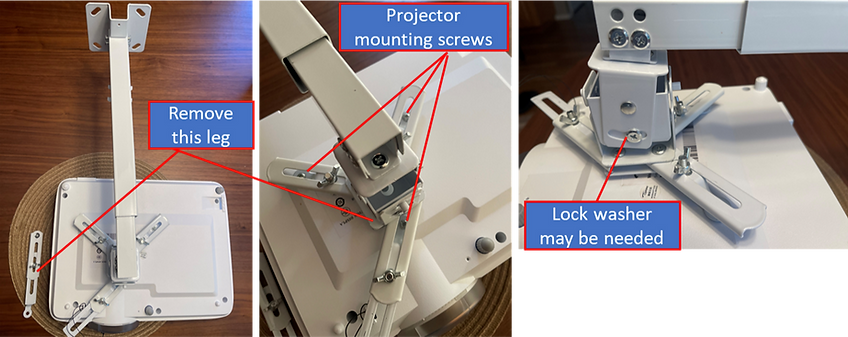
Shelf Mount
wall installation, great for End-mount

This "Shelf Mount" works best as an End-Mount (not viable for Side-mount), with your wall at the desired ~5'6" - 7' distance. This particular room has a vaulted ceiling which would have made a ceiling installation challenging. A 12"x24" shelf, two brackets, a projector mount (like on the Shop page) and some screws & drywall anchors are all that is needed. The projector mount is attached close to the front edge of the board to allow for projector tilt and rear clearance for the power and HDMI cords. The projector mount provides simple vertical and horizontal tilt adjustment to achieve correct table illumination. A 3 outlet extension cord provides power for the ICATS and projector, with the ICATS and extra cords tucked on top of the shelf (hidden) for a nice, clean look.
ICA Portable Stand
This portable ICATS stand comes with a metal tripod, and a custom mounting system that is quickly assembled and attached to the tripod.
Also provided is a tiltable projector mounting bracket. Between the tripod height adjustment and tiltable mounting adjustment, you'll be able to position your ICATS for optimum operation in almost any room and table situation. The stand can only be used for an Vertical-mount configuration. The stand may be somewhat close to the table and may require a "vertical flip" (shortcut key "v") to reposition the layout for an unobstructed shot. When not in use, the stand can easily be moved out of the way or packed up in the included tote bag. This projector stand is ideal for portable use of the ICA Training System and for Instructors who teach at multiple locations!
