
Custom Pipe Vertical Mount
This guide covers the DIY ceiling-drop pipe mount method for positioning a projector directly above the pool table surface with the lens pointing straight down. Vertical mounting is a special-application option.
Use this method only when the projector manufacturer's published specifications explicitly approve operation with the lens pointing straight down. An ICATS configurator recommendation or a compatible mounting bracket is not the same as that manufacturer approval. Using a projector outside its approved mounting orientations may cause damage and may void the manufacturer's warranty. A High Altitude or increased-fan-speed setting does not establish manufacturer approval.
When to Use This Method
Use the custom pipe vertical mount when:
- The projector manufacturer explicitly approves lens-down operation.
- Side-Mount and End-Mount are impractical in this room.
- You need to mount the projector above the table edge, projecting downward.
- A commercial vertical mount bracket is not available for your projector model.
- You are comfortable with basic hardware assembly and ceiling attachment.
Not sure if this method applies? Confirm manufacturer lens-down approval first. Then check whether your room-fit results recommend Vertical. A Vertical recommendation still does not replace the manufacturer's specification.
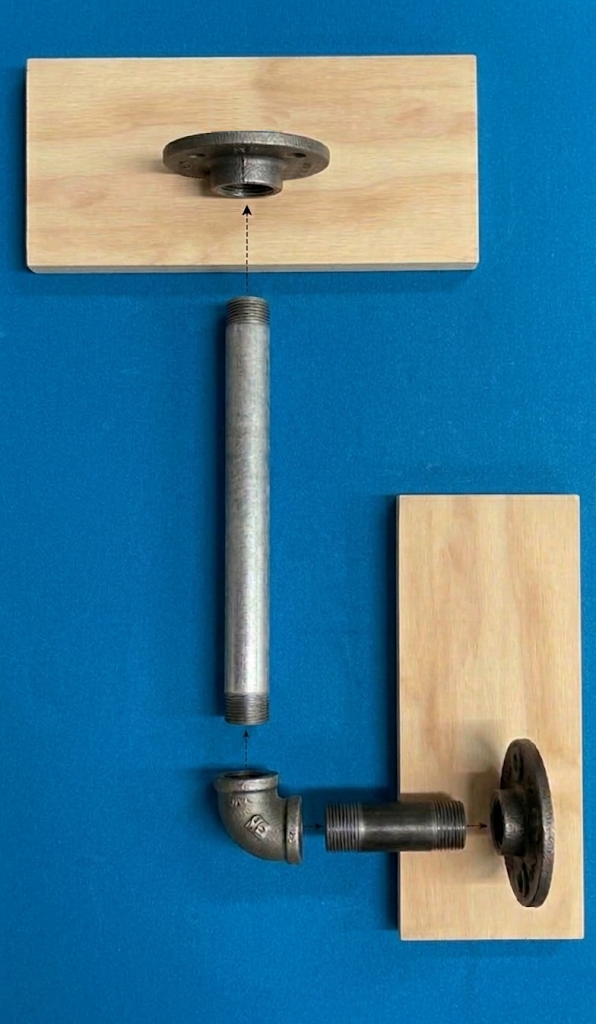
Required Parts and Materials
You will need the following. Specific dimensions depend on your ceiling height and projector model — refer to your configurator results for recommended measurements.
- Threaded pipe or rigid conduit — sized to span the distance from your ceiling attachment point to the desired projector height. Length depends on your ceiling height and projector throw distance requirements.
- Ceiling flange or mounting plate — securely fastened to a ceiling joist or structural member. Must support the weight of the projector plus the pipe assembly.
- Projector mounting plate or adapter — attaches the projector body to the bottom of the pipe. Must match your projector's mounting hole pattern (check your projector manual for dimensions).
- Fasteners — lag bolts or structural screws rated for the combined weight of the assembly. Use fasteners appropriate for your ceiling material (wood joist, concrete, steel).
- Lock nuts or set screws — to prevent the projector from rotating on the pipe after alignment.
- Basic tools — drill, level, stud finder, wrenches, tape measure.
Assembly Overview
1. Identify the Ceiling Attachment Point
Locate the position directly above the center of the playing surface. Use a plumb bob or laser level to verify the point is centered. The attachment point must be on a structural member (joist, beam, or blocking) capable of supporting the full assembly weight.
2. Install the Ceiling Flange
Secure the flange to the structural member using appropriate fasteners. Verify the flange is level and firmly attached. The flange must not flex or rotate under load.
3. Assemble the Drop Pipe
Thread or attach the pipe into the ceiling flange. If using threaded pipe, hand-tighten and then secure with a wrench. The pipe should hang vertically — check with a level.
4. Attach the Projector Mounting Plate
Secure the projector mounting plate or adapter to the bottom end of the pipe. Ensure the plate is perpendicular to the pipe (the projector lens must face straight down).
5. Mount the Projector
Attach the projector to the mounting plate using the projector's standard mounting holes. Tighten all fasteners but do not over-torque — follow the projector manufacturer's recommendations.
Alignment
After mounting:
- Power on the projector and project the ICATS calibration pattern onto the table surface.
- Adjust the pipe rotation (if applicable) so the projected image is aligned with the table's long axis.
- Verify centering — the projected image should be centered on the playing surface. If it is off-center, loosen the ceiling flange, reposition, and re-secure.
- Lock the rotation — once aligned, tighten all lock nuts and set screws so the projector cannot rotate.
Safety Notes
- Weight rating: Verify that all structural attachments (ceiling joist, flange, fasteners) are rated for at least twice the weight of the full assembly (pipe + projector + mounting hardware). Consult a qualified contractor if you are unsure about your ceiling structure.
- Do not mount to drywall alone. The flange must be secured to a structural member. Drywall anchors are not sufficient for overhead projector mounts.
- Cable management: Route the projector power cable and any signal cables along the pipe or through conduit. Do not leave cables hanging loosely.
- Periodic inspection: Check all fasteners and the ceiling attachment point periodically. Vibration and temperature changes can loosen connections over time.
Final Checks
Before running your first ICATS session with this mount:
- Projector is securely attached and does not wobble or rotate.
- Projected image is centered on the table surface.
- All cables are routed safely and are not under tension.
- ICATS calibration pattern aligns correctly after running the calibration procedure.
If the projected image is tilted, shifted, or not filling the expected area, re-check the pipe alignment and projector position before re-running calibration.
This is a DIY installation method. ICATS provides this guidance for reference. Always ensure your installation meets local building codes and safety requirements.